How to replace your iPhone battery?
According to Apple, your iPhone's battery is designed to retain at least 80 percent of it's full capacity after 500 charge cycles. That means it won't last as long as it did when new after a couple of years. If your battery won't even last a day with normal use, it's probably time to get a new one: we show you how to fit a battery in your iPhone and save money compared to Apple's battery replacement prices.
How to replace your iPhone battery: save money using our step-by-step guide
Step 1. Turn off your phone by holding down the power button, then sliding the on-screen button to the right.
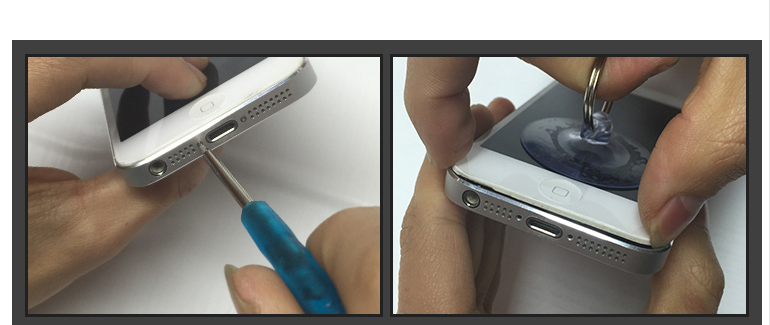
Step 2. Use your screwdriver to remove the two screws on the bottom edge of your iPhone. Keep all screws somewhere safe, as they're extremely easy to lose if left loose on your work area.
Step 3. Using the suction cup, apply strong (but not sudden) force just above the home button, or to either side of it. You need to open up a small gap so you can begin to pry the screen open. NOTE: if you have an iPhone 5S be extremely careful at this stage. The TouchID cable connects to the bottom half of the phone and is easily damaged if you pull the screen up too far.
Step 4. Using the pry tool, work your way from the bottom to the middle of each side to release the clips holding the screen to the phone.
Step 5: You can replace the battery without disconnecting the screen from the phone, but you'll have to hold it carefully at 90 degrees throughout. If you do want to remove the screen, use your screwdriver to remove the metal plate securing the screen's cables to the phone. Then, carefully pry up each connector and remove the screen.
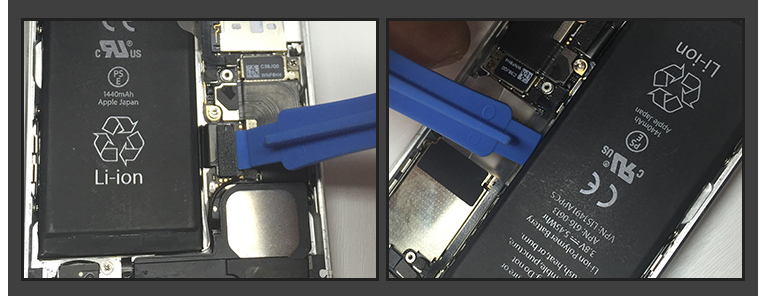
Step 6: Remove the two screws from the metal plate which secures the battery contacts to the motherboard. Each model differs slightly, but they are in the same positions as shown on our iPhone 5 here. The plate remained stuck to the battery connector when we swapped our battery, but it's easy to pry off.
Step 7: Try pulling on the plastic battery release tab to unstick the battery from the case. Usually this will not work as the glue is too sticky. Again, constant pressure is the key, and you should hear the battery slowly unsticking. Our preferred method is to use the pry tool very carefully against the motherboard to ease it up, but there is a risk you could damage a component on the board, so don't apply too much pressure.
Step 8: With the battery out, carefully align the new one, ensuring the cable is routed and bent so the connector is lined up with the motherboard. Gently press it into place and screw the metal plate down to secure it.
Step 9: If you removed the screen entirely, reconnect the cables - they should positively click back into place - and then replace the metal plate, inserting the lugs first.
Step 10: Hook the top edge of the screen into the body of the iPhone and make sure it isn't protruding by more than half a millimetre. If it is, you haven't seated it properly. Then, gently press the screen down working your way from the top to the bottom. The clips should click into place and you should have no resistance when replacing the two Pentalobe screws.
Step 11: If your phone won't turn on, don't panic: it's likely the battery was sent fully discharged for safety, so connect your charger and wait for the phone to turn on.


The iPhone may look impenetrable, but there are only a few screws that need to be removed in order to get the battery out, and anyone that can wield a screwdriver should be able to complete the job in less than ten minutes.
Make sure you order the correct model for your phone. Here are the part numbers you need for the various iPhones:
iPhone 4: 616-0520 or 616-0513
iPhone 4S: 616-0580
iPhone 5: 616-0613
iPhone 5C: 616-0667
iPhone 5S: 616-0728
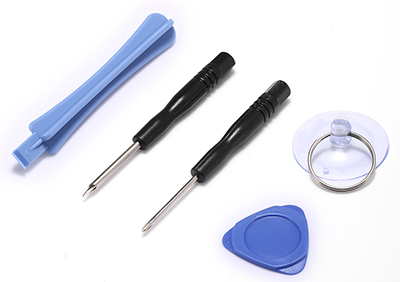
As well as a battery, you will need a toolkit including a standard screwdriver, a plastic pry tool and a suction cup. The only specialist tool is a screwdriver for undoing the proprietary screws in the bottom of the iPhone. Such toolkits are cheap and readily available, but it might save money to buy a battery which comes with the necessary tools.

 Replace laptop batteries IN New Zealand